
Protecting workbook and worksheet
At every company there are certain data that should be kept secret. Also, sometimes we do not want everyone to be able to edit the document, especially when it comes to corporate reports that should have a unique form. Since Excel is a tool frequently used for budgets or as a tool for interpreting business reports, it’s important to know how to protect individual worksheet elements, the structure of the workbook, and the workbook as a whole.
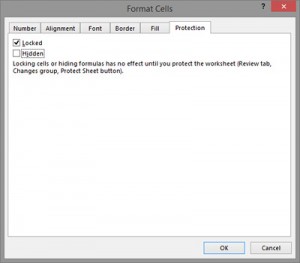 Before we start the story of protection, we need to go back to the formatting of cells, or to the well-known dialog box Format Cells. His last tab is called Protection and it contains two options very important if we want to protect the table: Locked and Hidden. The first option, which is initially turned on, is to define whether the cell is locked or not. If the cell is locked, in case of protecting the table, we can set that the user can not select that cell. For example, in the whole table, we can determine only a few cells that are unlocked. After protection of such a table, the user will be able to enter and modify data only in unlocked cells. The second option determines whether the cell is hidden. It does not physically hide the content of the cell, but does not display its contents in the Formula Bar. This option is used if we want to see in the table the results of a formula, but not the formula itself.
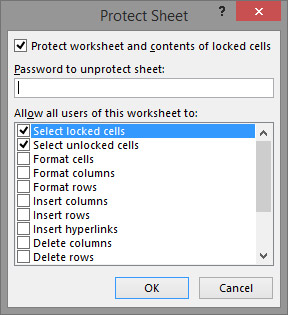 Protecting the worksheet is done by positioning it on a worksheet we want to protect, and then in the Review ribbon, select the Protect Sheet option. After launching the dialog window, we will see a large number of options in it. These options determine what a user can do in a worksheet after it is protected, which can be: selecting locked cells, selecting unlocked cells, formatting a cell, formatting a column, formatting the order, etc. During the protection, the worksheet can be protected by a password. After entering the password, it is necessary to repeat the entry to check that it has been entered correctly, as the password is not visible while entering. By clicking OK, the worksheet is protected. At this point, the Unprotect Sheet option appears on the site of the previous one. By clicking this option, the protection stops. If we have previously set a password, you need to enter the password to stop the protection of the worksheet.
Clicking on the Protect Workbook opens a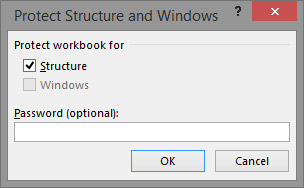 dialog box with two options: Structure and Windows. By marking the first option, the structure of the workbook is protected, that is, it is forbidden to move, copy, delete, change the name of the worksheets, reveal hidden worksheets … Another option is active if the worksheet consists of multiple windows. By marking it, it is not possible to change the size and position of the windows in the workbook. Also, it is possible to apply a password to protect it in the same way as when protecting the worksheet. When we protect the workbook, a new click on the Protect Workbook option protects it.
In the end, it is sometimes important to protect a workbook (document) with a password so that no one who knows the password can access its contents. Protecting the Excel document is done by entering the Backstage View, selecting the Info menu, and then in the Protect Workbook menu, select option Encrypt with Password. Starting this option will open a dialog box that will ask us to enter first and then re-enter the password. By saving such a document, its protection is done. That is, any user who wants to open it after leaving the document will not be able to do so if he does not know the password. The Protect Workbook menu also features Restrict Access. With this option, it is possible to change the system user rights to access or modify the document.