How to use macros
Macros represent short programs that the user mostly does not write, but are automatically generated by Excel. Their role is to automate frequently used procedures, and more ambitious users can use them to develop applications with the powerful Visual Basic for Applications (VBA) programming language. In this way there are almost no things that can’t be done in Excel, so it becomes a development platform.

To allow the use of macros, you need to enable the Developer ribbon. We do this by first clicking on the File tab in order to enter the Backstage View. Then click on Options, and on the Customize Ribbon tab and in the list of the toolbar shown, we mark the Developer ribbon to make it visible. By clicking OK, it will appear on the screen. If we click on the Developer ribbon we will see that it contains many development options. Add-Ins group of options can be used to turn on or off additional Excel components. By clicking on the Insert menu, we can enter some of the controls in the Excel spreadsheet, such as: button, checkbox, radio button, drop-down list, etc. At this point, the subject is how to make a macro, so through the example you will see how to make a simple macro that paints the background of the selected cell in yellow.
First, in the Developer ribbon you need to select the Record  Macro option. After we have selected it, Excel starts to take track of all of our actions and based on them it generates the VBA code. When we finish recording we can modify the code and manually change some of its elements, which will be shown later. So, since we clicked on the Record Macro, a dialog window will open where we need to enter the name of the macro, a short description, the location where it will be stored, and possibly we can add a shortcut from the keyboard to activate it. Clicking OK starts recording. In this case, we will only click on the Home ribbon, then select the yellow background color for the current cell. Then, we return to the Developer ribbon and choose the Stop Recording option to complete the recording.
What’s the code that we have generated? If we click on the Visual Basic option in the Developer ribon or press the ALT + F11 key combination, Visual Basic Editor will open. It’s a comprehensive development environment that can be used to write macros, functions, design forms, and more … For now, on the left, you need to select VBAProject, then Modules/Module1, in order to show the code generated when recording the macro. The code begins with the Sub command, then by the name of the macro and the parameters in brackets (if no parameters this line ends with a pair of brackets). At the end of the code is the End Sub command. If we know the Visual Basic for Applications programming language, we can manually modify the code and adapt it to our needs.

To see all the macros created in Excel, we run the Macros option from the Developer ribbon. A dialog box that offers many options will open. Use Edit and Step Into to enter Visual Basic Editor. Options allows us to add a shortcut to the macro afterwards using the keyboard. The Delete option is used to record the macro, and the Run option to run the selected macro. So, in our case, we first need to select a group of cells that we want to “color in yellow,” and then run the macro.
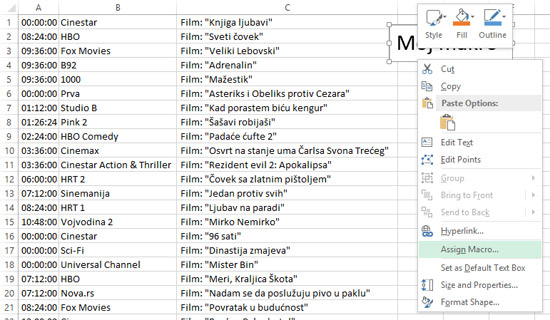
Running a macro can also be done using a graphic object or some of the controls. For example, in the Insert ribbon we can select the Text Box option and create a text object with the text “My Macro”. After creating, if we right-click on it, in the context menu, the option for assigning a macro (Assign Macro) will also appear. Selecting this option will open the dialog window in which we choose which macro will be triggered by clicking on the object. After confirmation, the object will be assigned a macro, and each time we click on it, it will be executed.