
Printing preparation options
The appearance of the table on the screen can be quite different from its appearance after printing. Therefore, Excel has several options that allow you to prepare document for printing by: determining page orientation, paper size, defining document margins, headers, footers, page numbers … Also, an existing document may be set fit desired number of pages. The listed options help us to make regular, transparent and functional reports.
The options for print preparation are divided into several groups and are part of Page Layout ribbon. The first set of tools is called Page Setup and we can access them by clicking on a particular option or group of options, as well as through the Page Setup dialog box. It contains detailed page layout settings when printing, and opens by clicking on the icon in the lower right corner of the group.
The Page Setup dialog box 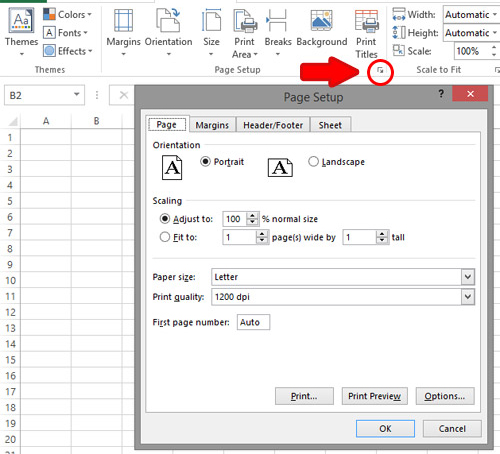 consists of four tabs in which a number of options are available. The first tab Page can be used to adjust the orientation of the paper (horizontal or vertical), the type of paper, the print resolution, the number that starts the first page … Also, there are several options for scaling content. The first one, Adjust to, allows you to, by clicking on the arrows or manually typing the values, adjust the percentage of the print size compared to the original. With this option, for example, we can reduce the percentage to achieve a slightly larger table, which does not stagnate to one page. Instead, we can use the Fit to option, where we set how many pages in length and how much across the width we want to fit the table we want to print. These options can also be found in the Page Layout ribbon, grouped as Scale to Fit options.
The second tab (Margins) contains the options necessary to adjust the upper, lower, left and right margins of the document, as well as the Header and Footer margins. We enter the margin margin manually by clicking on the arrows, or by entering a margin size directly. Depending on regional settings, the margins will be displayed in inches, centimetres or millimetres. If we want to change these settings, you need to start the dialog box for setting Excel options, and then select an advanced option group (File/Options/ Advanced). There is a group of options labelled as Display, and among them is a combo list Ruler units that needs to be changed from the default value to the unit of measure we want to use. The Margins tab also contains two optional fields in the Center on Page group, and are called Horizontally and Vertically. By marking them, we achieve that the data table is centred on a sheet horizontally, vertically or in relation to both paper sizes.
Since the printing preparation options are numerous, so as not to skip some important details, in the following texts we will discuss the functionality provided by the last two cards: Header/Footer and Sheet. These tabs are used to adjust the display of the header and footer of the document, as well as the elements of the worksheet that we want to print.