Sorting data
When we enter data in a table, we often need to edit them in a ascending or descending order. In other words, sorting them. Excel offers quick sorting, according to the content of the first column in the table, as well as advanced sorting where it is possible to set several criteria and select multiple sorting methods. The following text will detail the sorting of data, and I’m sure you will learn something new.
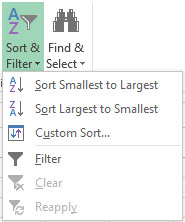
 Sorting data is done by selecting the entire table or a column of data. In the Home ribbon, clicking on the Sort & Filter icon opens a menu that offers three sorting options. First, there are two options for quick, and then an option for advanced sorting. The first option relates to sorting in a ascending, and the other in descending order. Depending on the type of data in the column we have selected, it has a different name, so it can be called Sort Smallest to Largest, if we sort the numbers, or Sort A to Z, if we sort the text. Accordingly, the second option is called Sort Largest to Smallest or Sort Z to A. If we have selected a table, sorting the whole table is done in relation to the data in the first column. However, since we often sort by one or more arbitrary criteria, we will use the Custom Sort option more often. Starting this option opens a dialog box which contains sorting options in its header, and body of a window contains list of sorting levels. Sorting is done at least at one level, which means arranging one of the columns in ascending or descending order, and it can be done at multiple levels. In this case, after the data is sorted according to the first sorting criterion the arranging continues on the second, third, and other levels …

For each level of sorting, the column name after which the table is edited is first entered. After that, a sorting criterion can be entered, which can be: Values, Cell Color, Font Color, or Cell icon. The last option is used if the conditional formatting of the table has been previously performed. Finally, the order of sorting is selected: from a Smallest to Largest, from a Largest to Smallest or based on previously created user lists (Custom Lists).
Add new levels of sorting by clicking the Add Level button, and delete the level by first positioning it on it and clicking the Delete Level button. The level can be copied, by clicking Copy level, and then modified to get the desired sorting method. To the right of this button are two icons represented by arrows. When we are positioned at some level and we click on the up arrow or down arrow, we move the sorting level in the hierarchy up or down. In the upper right corner of the window there is the My Data Has Headers field. If we have a table with a header, this field must be highlighted. Otherwise, header data will have the same treatment as other data, so they will also be sorted.
By clicking the Sort Options button, the same dialog box opens. First of all, by marking the Case Senstitive field, we can emphasize that when sorting, it is necessary to make a difference between uppercase and lowercase letters. Then, choose whether to sort from top to bottom, or to the left to the right. In most cases, the table we are sorting has a header at the top, so the default is default. However, sometimes it happens that the header is on the left, and the data series are in columns. In this case, the option to sort from left to right is selected.
